Monday, January 31, 2011

Dresser Update

This past weekend, I was hard at work on the buffet/dresser for my bedroom. I got 3 of the 5 drawers done, 2 coats (1 to go!) on the other 2 drawers and I got the first coat on the body of the dresser (I think it'll take 4 since the coat went on thinner for some reason). I still haven't started painting the cabinet doors. I'm not sure why I'm at different points for everything. You'd think I would have put one coat on everything every time (but then I'd be done, and that's just too easy...).

I haven't worked on it at all today. It's cold outside and it's just one of those days. But here it is, ready for coat #2. You can also see the untouched cabinet doors on the right.

Here you can kind of see how gorgeous the top turned out after 3 coats of poly.

And here's the drawers in their finished/semi finished states.

Once I get everything painted, I'm going to be putting a liner in all the drawer bottoms. I picked up some super cute wrapping paper for that this weekend. I'll be doing the same thing that I did in the Lego table drawer.

I also had my hubby move the nursery dresser into the garage so I can start on that. It's been living in our foyer since we moved in over a year ago. Please ignore all the stuff piled on and around it. Our foyer has been quite the dumping ground lately...

Here it is taken apart in my garage. First things first, it needs some work. At least one drawer needs a new bottom. One side of one drawer needs to be fixed. I need to replace a drawer slide and the top has some serious water damage and needs to be sanded down/fixed. After that, I can clean it, paint it and put in drawer liners.

If the weather improves soon (it's been cold and cloudy today, boo!), I'm hoping to at least finish the buffet and get started on the nursery dresser by the end of the week. Next week, I'm sewing! (or at least that's the plan right now...)

Friday, January 28, 2011

Staining the top

I woke up this morning having had the strangest dream. I was invited to go to this crafting-type conference and decided to take my buffet to show off. The only problem - it wasn't finished. I was scrambling around at the conference trying to find the right tools/materials to get it finished in time. So, I decided to spend the day working on that buffet when I woke up. I'm not finished, but I'm getting closer and I'm LOVING it!

Here's the before. The summer of 2009, I discovered Craigslist and scored a nice couch for $50. I was hooked. Soon after, I found this ugly piece and for $60 it was mine. My husband thought I was crazy for getting it and told me so several times. It doesn't look as bad in the picture as it was in real life. Lets just say the paint job was horrible and leave it at that.

Last year, I finally started stripping it down and that's as far as it got. I changed my mind (totally normal and expected according to my husband) about where I wanted to put/use it and so it just sat in the garage collecting dust.

Last weekend, my husband decided he'd help me out and finish stripping the top down so we could re-stain the top. This morning, after getting #1 to school, I busted out the power sander and sanded off the rest. After hand sanding the scalloped edge, it looked pretty good and I started getting excited.

At this point, I'd pretty much used up my energy, so I didn't get back to it until this afternoon. I put on my lovely mask that makes it possible for me to keep doing these fun things while pregnant and added a dark walnut stain to the top.


Here it is soaking it up:
And this is after I got the stain all rubbed in. Doesn't it look great?!?! It has to dry for 4 hours, then I get to start putting the poly on. After that, I'll be painting the rest. It's going in my bedroom and I can't wait to see what it looks like!


Thursday, January 27, 2011

Organizing Toys

Our boys got a lot of Trios and Duplos for Christmas this year. I had hoped that the buckets that came with the sets would be enough to contain everything, old and new, but I was overly optimistic. So, Monday, I headed to Walmart and picked up a couple of clear plastic bins for the toys. When we got home, I cut TRIO and DUPLO labels out for each bin and #2 helped me stick them on. He ran off with his new Trio bucket before I could get a picture.

The best thing? These two bins stacked fit perfectly inside our expedit bookcase in the loft! Walmart also carries a bin twice this size. I bought one a few weeks ago to store all my craft night excess supplies and it fits perfectly too. I'm starting to think I should maybe get a few more...

Wednesday, January 26, 2011

Cherry Pie Filling and Syrup, YUM!

Last week a friend of mine came over to help me can my last 30lb bucket of cherries from my freezer. The first one became bottled cherries back in November. These cherries became pie filling, yum! We got 24 pints and 2 quarts of pie filling out of the cherries. Most canning recipes say to can your pie filling in quarts because it takes 1 quart to fill an 8 or 9 inch pie plate. I don't usually make pies with my pie filling though. I use it to make fruit crisps and one 8x8 pan takes 1 pint, so I can my pie fillings in pints. I did 2 quarts this time around for pies this Thanksgiving.

This time around, we also saved all the cherry juice from the cherries thawing out and made pancake syrup with it. We got 5 batches of syrup, 12 pints and 5 quarts (I ran out of regular mouth lids). My husband makes pancakes for breakfast every Saturday morning (a family tradition his sister told me about and I insisted my husband do it too), so we go through a LOT of syrup at our house. We tried our new, pink syrup this past weekend and it was a hit! Good thing, too, since we've got so much of it.

Here's everything cooling on my toweled counter.

Friday, January 21, 2011

Wonderful Wednesday Craft Night

We are *finally* getting to another craft night! So...

You're invited to Wonderful Wednesday Craft Night!

Who: Anyone local. If we don't know you personally, you'll have to prove you're a real person before we'll give you my address. :)
Where: My house
When: Wednesday, February 16th
from 7pm 'til whenever

*Please bring a snack food to share.*

We will be doing the following crafts:
Growth Chart
Chalkboard Menu Board
"I am a Child of God" Board
Birthday Cards and Card Organizer
and
Flower Pot Pens

Just click on the names to see more information about and prices for each of the projects. Click here to download/print the order form. All orders and money need to be in by Saturday, February 5th so Morgan and I can get everything ready for craft night. If you have any questions, please feel free to contact us and we'll do our best to help you out. We hope to see you there!

*If you would like to request a craft for us to do at a future craft night, contact me or Morgan and we'll see what we can do. We're really excited about this craft night and are already brainstorming crafts/ideas for future ones later this year. With my baby coming in April/May, we're shooting for our next craft night to be in July sometime.

Growth Chart

We will be doing the much anticipated growth charts. They will be 6 feet in length. There are several options for these charts, making the price determined by the options you pick. Because the boards are so long, they will be pre-painted or polyurethaned depending on your choice of wood or MDF. The basic kit will include the inch markings and the numbers 0-6 in vinyl. You can choose the basic kit in high quality pine wood with a polyurethane protective coat or the MDF board basic kit which includes your choice of paint color: white, light blue, light pink, or light green. We also have a "Watch Me Grow!" embellishment for your board, if you want. You can choose your flower color separate from the words.

Pictured here are two samples that we made. The right one is the wood option with the basic kit. It is made to be flush with the floor. The left one has the "Watch Me Grow!" embellishment and is meant to be hung 1 foot off the floor. We will be selling these samples at craft night, if you like one and don't want to make it yourself. The wood yardstick version is $50.00 and the white MDF with pink lettering is $42.50. Please let us know in an email (allthingscreativeaz@gmail.com) if you are interested in purchasing one of these sample. First come, first serve.


The following are the various font options for numbers and any embellishments you would like on your growth chart.

Flower Pot Pens

We'll be making flower pot pens for craft night. This will include a clay pot, filler and 6 pens with flowers. Flowers will vary from those pictured below.


These are a great fun item to have on display while keeping pens close. My boys LOVE getting to use my flower pens.

Birthday Cards and Calendar

If you have a New Years resolution to not forget anyone's birthday this year, this will help. We will have birthday cards in sets of 15. Each set will come with the cardstock, scrapbook paper (cut to size), envelopes and one 12 x 12 sheet of vinyl embellishments in your choice of color. You can choose from the 3 vinyl options below, or order 3 sets and get all 3. Cardstock colors and scrapbook paper will vary, but we will try our best to coordinate your chosen vinyl color with the cardstock and scrapbook paper. Available vinyl colors are black, white, beige, chocolate, lt. brown, lt. gray, dark gray, blue, green, bright pink and red. You may want to bring your own paper cutter and corner punches and such (if you have them) since we only have a couple.

Here is a sample set of 15 cards.


To help with organizing these cards, so you don't forget anyone's birthday, we will also have super cute birthday card organizer kits. Each month has it's own large envelope to store your birthday cards according to birthdays, along with a place to write each person's birthday on the outside. Months will be laser printed in the font pictured below.

Menu Boards

Here's another requested craft, the menu board.

Again, there's a few different options for the menu board. *All boards are 12" wide and 22" tall.* Below are the 4 different font options. The MDF boards will be 1/2" to 3/4" thick for mounting on a wall. Or you can choose the backer board option, super thin for mounting on your pantry door (or another door). The days of the week are cut out of the chalkboard vinyl so you see the color of your board underneath. You can have white vinyl (if you want to paint your board dark) instead of the cut out days of the week. We will have white and antique white paint available that night. If you want a different color, please bring it with you. This kit will come with a chalkboard marker for writing on the the chalkboard vinyl.


"I am a Child of God" Boards

We'll be making "I am a Child of God" boards. Perfect for a little kid's room! You can choose to do either a 3 1/2 ft board or a 2 1/2 ft board. There are 4 font options to choose from in a variety of vinyl color options. Paint colors we will have available that night are white and off white. If you would like to use a different color, please bring it with you. Available vinyl colors are black, white, beige, chocolate, lt. brown, lt. gray, dark gray, blue, green, bright pink and red.


Tuesday, January 18, 2011

New Dresser

Part of my To Do List includes finding some new furniture. So, I hit up Craigslist. The first thing I was hoping to find is a new dresser for my boys. They currently are using this dresser we bought at Walmart before I learned about the joys of Craigslist. I considered getting the matching tall dresser, but I'm kind of over the blue. They only way I could convince my husband to replace the blue dresser though (we just got it 2 years ago) was if I could find a dresser we could keep stained... and Craigslist delivered!

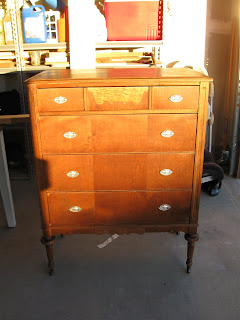
I found this cute antique dresser a little over a week ago. The lady had it professionally stripped to the bare wood and stained it herself, but never got around to putting any poly on it. She just wanted it out of her garage. The only problem was it was an hour away from where I live. However, I had a doctor's appointment near there a week after she listed it, so I promised myself I'd go look at it if it was still listed then. After getting hubby's approval, I emailed her and was able to bring it home this past Friday! She told me that she bought it almost 40 years ago, used at the Salvation Army for her then 2 year-old daughter. It was originally white, but a few years ago decided to get rid of the paint. The dresser reminds me of the antique furniture that my best friend's house is filled with. She and her husband inherited a LOT of furniture from grandparents and I just drool over it all whenever I go to visit.

Here it is Saturday in my garage, just before I started putting the poly on. She also had the original hardware, but it wasn't installed when I picked up the dresser.

My husband decided that I needed to change the color of the hardware. I agreed.


So, Monday after taking my kids to the Zoo, we ran around until I found this Rub N' Buff stuff I've read about in blogland. I found it at Michaels in the acrylic paint area. It's a tiny tube, but it goes a LONG way.

After rubbing this stuff on, they looked great, but it rubs right off, so I sprayed a clear coat on top to protect the finish. I figure, if it starts coming off, I'll do something else with them. I love how they turned out though!

And here's my dresser, fully assembled in the garage. I can't believe the difference a couple of coats of poly made to this dresser!


It'll probably be stuck in the garage until I can empty my craft room and get it moved to it's new home in our boys new bedroom.

We have another double dresser that is a very similar stain to our new dresser. It'll get moved into our boys bedroom and the blue one will go on Craigslist once their room is finished. I've been working on picking paint colors for their room lately - so fun!

In other furniture news, my husband decided to work on stripping the buffet (pictured here) we've stored in our garage for the past 2 years almost. I'm hoping to paint and stain it soon!

Tuesday, January 11, 2011

Ice Cream Brownie Cake

Sunday on the way home from church, I had a great idea. "Let's make an ice cream cake." My husband and I discussed all the different ways we could possibly do that. We decided on a top layer of brownie followed by a layer of vanilla ice cream. After lunch, I got started.

I made a brownie mix and baked it in a 9" spring form pan.

After that baked, cooled and then froze in the freezer, I made some vanilla ice cream. We got an ice cream maker attachment for our KitchenAid for Christmas and homemade ice cream has become a new favorite hobby. The brownie mix I used had a packet of fudge topping, so I "swirled" it in the ice cream at the last minute. It kind of chunked up, but it's still very yummy!

Here's the ice cream right after I added it to the bowl.After adding the fudge topping, I poured/scraped out the soft ice cream on top of our brownies. It perfectly filled our spring form pan. I covered it in aluminum foil and sort of smoothed out the top with my hands, then stuck it in the freezer.

A few hours later, we pulled it out of the freezer and turned it upside down onto a frozen marble slab we've had sitting in our freezer for a month. (I was going to kneed some candy with it in December, but decided against doing that particular candy. Maybe next year.) Unfortunately, the brownie stuck to the bottom of the pan and my husband had to use a plastic spatula to pry it off. We flipped it over onto the ice cream part and it still looked pretty good.

This was a fun dessert to make and we gobbled it down. I want to try another ice cream cake with several layers of ice cream next. Right after Christmas I made this super yummy peanut butter ice cream, so I think I'll do a chocolate, peanut butter and vanilla layered cake. Yum!

My parents sent me a couple of boxes of recipe books a little over a year ago. Amongst the group was this ice cream recipe book. That's where I'm getting all my ice cream recipes. So far, we've tried Raspberry Sour Cream Ice Cream, Orange Chocolate Sherbet, Peanut Butter Ice Cream, Eggnog Ice Cream (recipe found online), Banana Marshmallow Ice Cream and now Vanilla. Pink Peppermint Ice Cream and Orange Yogurt Ice Cream are next on the list of ice creams to try.

Thursday, January 6, 2011

Hall Bath with decor

I'm almost done with our hall bath! I've been making slow and steady progress this week and I hope to finish everything up this weekend.

I've been purchasing decor items for our safari themed bathroom for over a year now. One of the oddish things I picked up is this giraffe kick-line (that's what it looks like to me anyway...). I originally thought I'd use it to hang our boys' hooded towels, but it's just plaster and wouldn't hold. I decided it would look cute "hanging" little picture frames from it instead. I found some safari animal silhouettes and cut them out in vinyl. The picture frames I found at Walmart for $1.50 each. I threw the backs away and hot glued the glass in the frames. The silhouettes are on the inside of the frame. Before hanging the kick-line and frames in the bathroom, I made them a bit more waterproof by putting a coat of clear acrylic varnish. The frames are actually attached to the wall so they're a little more secure.


The next thing I did was install a wallpaper border just above the chair rail in the bathroom. I bought the border when I got the shower curtain (2 1/2 years ago!), but I wasn't sure I wanted to use it. The colors are just a bit different from the curtain to the border. After thinking about it for a few days, though, my husband and I just felt the room needed a bit more. It was really easy to install. It came pre-pasted and we just followed the directions on the back.

I've been working on painting a pegboard to hang the kids' towels at their height by the tub, but it's not finished yet. I'm hoping to get it finished today and installed tomorrow. Last night, I hung the hand towel holders (one at kid height and one at adult height) and hung some canvases I bought at Target a year or so ago.

Sorry about the lighting, there's no natural light in the bathroom and I took the below pictures last night at 10pm.

There's still a few more things that need to get done before it's finished. My new miter saw came this morning (yea!) so we'll be cutting crown molding tonight. I need to finish and install the pegboard, frame out the mirror, get matching hand towels, buy and install a towel rod and TP holder and get new bath mats (our current ones used to be brown, but now look more purple). Oh, and install the crown molding. I'm so excited that the first thing on my list is almost done!

I've also been working on cleaning up my craft room (slowly, but surely) and I hope to get that done in the next few days too.

Sunday, January 2, 2011

My 2011 To Do List

My personal resolution this year is to be consistent. No more starting a project and taking a month (or longer) to finish what should only take me a few hours or days at most. With our baby (our first girl!) coming mid-Spring this year, I'm focusing my To Do list on what needs to be done before her arrival. I love lists and my initial list was much longer. I pared it down to "just" the basics, which is still quite a long list.

First, we need to get the crown molding up in our hall bath and decorate the bathroom. I'm hoping to finish that in the next couple of weeks. I'll be getting my own miter saw sometime this week!

My craft room needs to be organized and boxed up (for the moment) so that #3 can move out of the nursery and make room for #4. My craft room is the largest bedroom in the house (outside of the master) and is the only one that'll fit all three boys.

After I empty the room, I'll be painting the walls some shade of green (at #1's request) and the ceiling a shade of blue. We'll also be replacing the baseboards (I'm a Southern girl and 2 inch baseboards just don't cut it in my book). We'll add crown molding, frame out the window and add a window sill. We'll also replace the current cheap mini-blinds with nice faux-wood blinds. I also need to make curtains and find a tall dresser I can paint blue to match the boys current double dresser.

We'll move the boys into their new bedroom and that will empty the 2 bedrooms they currently occupy. One will become the new craft room/guest room; the other will still be the nursery.

Once the nursery's empty, I'll replace those baseboards and add crown molding, window framing and new blinds in there. We'll also be painting the ceiling the same yellow as the walls and adding a green accent wall. I need to refinish all the nursery furniture in white (bench, rocking chair, dresser) and find a side table to refinish as well. I'm hoping for a french provincial style side table/nightstand. We also need to get a white crib (I got rid of our old crib when #3 went to a toddler bed) and make coordinating crib bedding (bumper, sheets and crib skirt).

The future nursery dresser is currently sitting in our entryway. If I can finish everything listed above before #4 makes her appearance, I'd also like to make a bench to fill that space in our entry.

After baby girl arrives, I'll be focusing on the master suite. I want to add shelves to the back wall of our walk-in closet, paint the bathroom and bedroom and get/refinish some new furniture.

Saturday, January 1, 2011

Crafting with the Stars

On a whim, I decided to audition for Crafting with the Stars at Sew Dang Cute. I entered my son's Lego table I finished in time for Christmas. You can go check out everyone else's entries and enter your own here. Sounds like it's going to be fun!


LinkWithin

Blog Widget by LinkWithin