Friday, August 27, 2010

The Loft

Here's what my loft looks like now that I'm done*.

Well, first I'll show you what it looked like back in March before I started all my changes. These pictures are a bit embarrassing because I didn't clean up beforehand. When you come up the stairs and look left, these are pictures from left to right around the room. Basically, we spent almost no time in this room and it was our catch-all junk room before the transformation.
I started with the blue lovesac above and picked out the colors for our loft from that. I ended up deciding against keeping it and we sold it on Craigslist a while ago. But that's where I got my color inspiration from. I decided to do blue, red, green, orange and yellow (which is our wall color) in our loft. Our loft is 16 feet square, so I think it handles the large variety of color really well. I also wanted it to multitask as much as possible since the room is so big. I think I succeeded.

Now the After. These pictures are taken from the same spot as the above Befores.

Sorry about the bad lighting I wanted to take the pictures with everything in its place so I took them at night. During the day, toys and books reign supreme in here.

Our Pediatrician's office has baskets of books in every examine room and in the waiting area. I loved the idea; so I took the baskets I used to store on our changing table and use them on our coffee table to store the books. The boys love that they can see the titles without dumping them out and they are pretty good about putting them away now too, which I love.

I spray painted the orange lampshade on the lamp above to help it coordinate with the loft even more. You can also see 3 of our 5 bean bag chairs. I picked them up in our loft colors from Walmart.com. It makes for great around the room seating.

Son #1 comes home from school and does his homework on this kid-sized Harry Potter table (below) that I bought in 2001 at Big Lots. It's one of my best impulse buys ever.

You can also see our expedit bookcase behind the table. Our older kid toys hang out in it. The baby toys are in the coffee table across the room. We'll see how long the organization last, but at least all the toys go back in the bins at the end of the day. We also have some larger toys that sit on top of (but still in reach of my older boys) or next to the bookcase .


I thought the area above our window looked a bit funny since I hung the curtains high with the angled/vaulted ceiling, so I filled in the space with the first line of one of my boys' favorite Primary/Children's Songs. I think it makes the window look more finished.


I put the art easel in the corner of the room. The tray for the chalk/markers faces the wall to keep them "out of sight, out of mind" for my youngest boy. We also have an art apron for each of my boys to wear while using the easel. Eventually, I want to get/make a hook rack to hang the aprons on the wall next to the easel. I just haven't done it yet. You can also see our toy box under the window. It makes a great window seat for checking things out outside.

And here's the front view sans pillows of the couch. You can read more about our couch here.

This room took me a long time (almost 6 months!). I made or remade most of the things in the room and it feels great! I love how the loft turned out and I love that my family uses the room now. We usually spend a large chunk of the day in there.

*I still need to paint the buffet and I'll be making the endtable next to the couch into a lego table for my boys (for Christmas). But I'm taking a break from this room and I'm going to work on something else for a while.

Mini Couch Pillows

I made a couple of couch pillows for our loft yesterday. They turned out a bit small...

I didn't want to make everyone move so I could get a picture, so you get a picture of my husband reading to my boys this morning. And, I was too lazy to move the laundry. Oh, well.

My boys love them and they are perfect sized for the boys to use for back support and such. Son #3 spent a LOT of time this morning snuggled up with one of them. I plan on getting (instead of making) another one or two solid colored pillows for the couch. I used an old pillow for the stuffing. Worked great!

Thursday, August 26, 2010

Keeping Time

I saw this super cute (I think) idea of a wall of clocks and saved the picture for inspiration. I can't remember where the picture came from (sorry!) so if you know, leave a comment and I'll give credit.
I thought a wall of clocks sounded like a really fun idea for our loft. My husband took some convincing, but I was successful! Then, I had to find a clock that I liked that I could afford to buy several of... Have you looked at the price of clocks? A nice one can run you $20 and times 6 to 9? I just couldn't afford that! I'd given up and was just going to make my own. I figured out that the least expensive way to get clockworks was to buy the cheap clocks at Walmart/Target and take the clock part out. When I went to pick up my son's school supplies, I wandered through the clock section of Walmart just to get an idea for what types of clock hands I could find and I found the perfect clocks and they were only $5! I didn't get them. Partly because I'd already started collecting supplies (like clock faces) for my clocks and partly because I wasn't sure what my husband would say if I brought all the clocks home all at once. And I wanted 9, but had decided I would just do 6 because clocks are pricey but now I wanted 9 again. I went back the next day after telling my hubby the great news. :) I actually had to order a few online to get all the colors in the quantity I wanted.

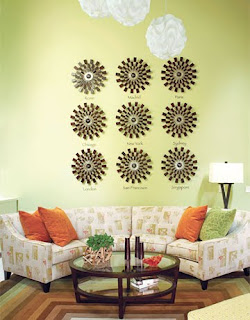
So, here's my wall of clocks!

I wanted to do locations around the world that had some significance with our family. Many of our siblings and myself and my husband all served missions for our church and we served all over the world. My sister also did a school year abroad in high school and one of my brothers currently lives in China, so I did those too for more around the world variety (3 of my brothers served in South America and I didn't want the locations that concentrated.) Currently, we have where we live up on the wall too, but I want to get another clock for the loft with the local time. (I seriously love clocks!) My husband's youngest brother is planning on serving a mission soon and we'll be replacing Tucson with his mission when the time comes. That way we can tell our boys, this is where your uncle is right now and this is the time! Fun, fun!

We also decided that it would be neat for the kids to see on a map where everyone served missions and/or lived. The boys love the map and Son #2 is constantly asking me "which country is that one?" Son #1 and #2 were telling me where they were going to go on their missions yesterday as I was putting up all the vinyl.

I added to the right side of each clock the difference in time from here to there. That way we can tell if it's afternoon, morning or even the next day whenever we want to. I also added the specific names of the missions under each clock. I picked up the map from Amazon. It had the best colors for our room. The coolest thing is all but one of our clock locations is on the map! Including where we live. The frame came from Walmart and we hung it at kid eye level.

I love how my wall turned out. It covers our tall wall nicely and looks great. Plus, the colors in the clocks and map coordinate really well with our loft. The only down side is with 9 cheap clocks all together, they are pretty loud. I don't mind that much (my kids are louder!) but my husband said he feels sorry for anyone wanting to sleep in our loft!

Stay tuned, tomorrow I'll show my finished loft! Well, finished so far anyway... :)

The Stockings Were Hung board

Morgan and I decided to add one more craft to our Wonderful Wednesday Craft Night coming up next month.

This is a "The Stockings Were Hung..." board. Here's the one Morgan put together to show everyone. There are a lot of options for this craft.


There are 4 different font options for this board. I couldn't decide which font I like best. You can choose between white, red and beige vinyl for your board. The paint colors we will have available are green (the one pictured in the Family What Matters Most board), red (pictured above) and white. If you want a different paint color, please bring your own.

Because we added this later, there is a separate order form just for this project. If you want the order form for this project, please let us know. Don't forget orders and money need to be in to Morgan or me by September 17th so we can get everything ready! See you on the 29th!

Wednesday, August 25, 2010

I finished the BINS!

Okay, so I actually finished the bins for our loft a couple of weeks ago, but as I've mentioned before - I'm slow, apparently with blogging, not just doing. So, here's a few pictures.

I measured the space of the cubby holes in my expedit bookcase and the leksvik coffee table and decided to make the bins just smaller than the space just to make sure the bins actually fit the space when I was done with them. I cut each bin out like a plus sign in the outer fabric and the inner lining. I ironed craft fuse on the outer fabric to help it hold it's shape.
Above is a picture of the outer fabric laid out. I'd already sewn the handles on for this one.

After finishing a couple, I realized that the craft fuse wasn't strong enough to hold the bottom of the bins flat when there are toys in it. So, I brainstormed for a couple of weeks. I was showing a good friend my progress in my loft one day and mentioned my problem and a possible solution I'd come up with and she suggested velcro (thanks Cassie!). What a genius!

To make the bottom sturdy enough to hold toys, I went to HD and had them cut some backer board to the size of my bins' bottoms. I then made a pocket with velcro attached (pictured below) the size of the bottom of each of my bins and sewed velcro into the bottom of the bins. Once I slid the backer board in the pocket and inserted them in the bins, the bottoms are completely sturdy! My boys have an easier time getting the bins back on the shelves because the bottoms are just the right size. With the pockets velcroed to the bottom of the bins, I don't have to worry about my boys pulling the bottoms out and using them as toys/weapons, so that's nice too!

Above is the backer board slid into one of the pockets I made.

And here they are in their new homes! Our loft/toy room stays so picked up and much cleaner now that all the toys are in bins. With each bin filled, I still have a couple completely empty too, so there's room to grow.

Please ignore the wild pile of books. I came up with a great solution to that and the books don't look like that anymore.

I had to give myself some motivation to finish the bins. My friend, Morgan was going shopping one night and invited me to come along. I decided that if I finished the bins before we left, I could buy some new picture frames so I can finally hang up all our family pictures. It worked! I sewed all day long and finished just in time to go shopping! Once I get the frames how I like them, I'll show you that too.

I also rearranged our loft (again) when I finished the bins. When I suggested moving things around again in the loft, my husband thought I was nuts and didn't want to help. Once I got started though, he took pity on me and helped. Our loft looks much better in the new arrangement and it opened up a lot of space for everything in the loft.

I have a couple more projects (it never ends...) to finish up in the loft and then I'll show the whole room off. I can hardly wait to see it all done!

Here's some tips and tricks and what I'd do differently if I'm ever crazy enough to do this again. First, I would have bought/used fusible fleece instead of craft fuse. It's much thicker, so it would hold the shape of the bins even better. I would also buy less fabric (I way over bought and still have almost 5 yards of the liner left. I ended up using most of my extra outer fabric for the pockets on the bins' bottoms).

Second, with the first half of the bins I made, I did each one individually. It took forever! I still had 7 1/2 bins to finish the day I went shopping, so I did those assembly line (do the same step to all of them before moving to the next step) and it saved TONS of time.

So, here's what I did. I ironed the craft fuse to the sides and bottom of each bin (with the backer board, I would skip ironing it to the bottom) and then sewed up the sides. I didn't add craft fuse to the liner, so I just sewed up the sides of those. Next, I inserted the liner into the outer fabric and pinned it around the top edge. I basted the two layers together. I made some bias tape from the lining fabric with my bias tape maker and sewed that around the top edge to give it a finished look. It was easiest to wait until this point to sew the handles on. I added a handle to both sides, partly because both the bookcase and the coffee table are open on both sides and also to help with getting the bins on the shelves. After adding the handles (which I sewed on with a big "X" in a square) I added the velcro in the bottom and slid my finished pocket in on top. The velcro doesn't line up exactly, but I used 2 inch wide velcro ('cause I bought a ton years ago for a project I never did) so it lines up enough to stick. I eyeballed the location for each of the handles, but measured for the velcro. The best thing about this project is that it actually turned out like I had pictured in my head!

Friday, August 6, 2010

Mirror, Mirror

About 2 months ago, I bought these two mirrors at a yard sale. I got both, plus an iron wall hanging for $7, I think. I knew exactly what I wanted to do with the mirrors when I found them, so I'm not sure why it's taken me 2 months to do this.

Here's a before of the mirrors in all their golden glory.

I spray painted them with Krylon Satin Black and then to kind of copy the Run-n-Buff I've seen lately in blogland, I dry brushed some silver metallic craft paint over the frames to bring out the texture. I LOVE how they turned out.

(you can click on the picture to enlarge it and see a little better the silver detailing)

Here they are in my now complete powder room downstairs. I got the lighthouse clock from a friend for $5. I was helping her clean things out and saw this clock, still in it's packaging that she'd gotten as a wedding gift 7 years ago! I thought it would look great in my lighthouse themed bathroom and I really like it!

The small painting you see over the toilet is another Thomas Kinkade lighthouse print. I bought it on clearance at Joann's and picked up a frame too (they were 40% off!). It complements my larger Thomas Kinkade lighthouse next to it nicely.


I'm so excited to finally have a complete room! I'm getting close in my loft/play room. Those bins are taking FOREVER - and I'm slow. Hopefully, I finish those up this weekend and can turn my attention to my clock wall. It's gonna be great!

LinkWithin

Blog Widget by LinkWithin