Monday, April 25, 2011

Latest from Craigslist

I've been thinking lately that I really need to get a bookcase for the kids books in our loft. We've got them in baskets on top of the expedit bookcase, but the baskets are starting to fall apart. After looking online for new options and deciding I didn't want to spend $100+ on a nice small bookcase, I turned to my favorite place for furniture - Craigslist.

I found a super cute smallish looking bookcase for $15 and the lady was selling 2 side tables for $20. I thought they looked fun and I'm wanting a side table in my bedroom ("re"make to start soon!), so I got it all for $35. The one mistake I made, however, was forgetting to ask for the dimensions of the bookcase before I bought it. I usually do and when I brought home this 3 ft tall, 3 ft wide bookcase, my husband asked, "Isn't this a bit big for the loft?" Yes, yes it is...

Too cute to turn down last minute and too big for my loft, so, I now have a perfectly sized bookcase to hold all our diaper bags, backpacks, church bags and other random stuff that lately has been collecting in the floor of our entryway. I like to change my mind a lot, but at the moment, the plan is to refinish the bookcase, replace the missing shelf and put it in our bedroom for our "re"make. Until then, however, it'll live in our entry.

As for the 2 side tables, I'm still deciding how I'm going to finish one for our bedroom. The other one, though I'm going to have some fun with and see how it turns out. If I really like it, I'll try to find a place for it. Otherwise, it'll end up on Craigslist again - it just won't be blue anymore.

Oh, and I'm still looking for a bookcase for the loft...

Saturday, April 16, 2011

Our Gallery Wall

It only took us a year and half. We had most of these frames when we moved a year and half ago. I felt that we needed a few more frames and bought those soon after we moved (for the most part, they're still empty, too). All I did was stack them in the living room and leave them - for months. Occasionally, the pile of frames would move around the living room to a new inconspicuous spot. Eventually, several months ago, I even filled most of the frames with photos, but when I was done, I just stacked them up again. My original intention was to hang them all on the wall leading up the stairs, so I've been stalling for a while. My husband decided to clean up our living room today and wanted to finally get those stacks of frames off the floor. I suggested our living room wall (I figured that would be easier than the stairs). He went along with it and I LOVE how it turned out! Now, I really want to work on decorating the rest of our living room - and finish filling that wall with frames!

Here's how we did it. First, I laid everything out on the floor how I liked it. I came up with this arrangement (ignore the mirror - it's going somewhere else).

My husband measured where he would need to start and where the bottom would end up while I started cutting out paper 'copies' of all our frames. We realized we'd need a new arrangement, so while he did the top row, I rearranged the floor to something like this:
We liked it and stuck it on the wall. We originally had the top row of frames level and decided that looked funny, so we did some rearranging on the floor and then copied that with our papers to make sure it looked good on the wall. Here's the finished result:
When I made all the paper copies, I wrote what was in the frames on the paper and marked where the nail would need to go for hanging that frame. Here's my hubby filling the dots with nails.
Then we started replacing the papers with the frames.

And here's the finished result:
I really like how it turned out. Now, I want to rearrange some furniture, get a sectional and finish filling the wall with frames. We decided that we'll finish filling the frames and update the photos (they were taken just before our move) at the same time - soon after this little girl comes. I can't believe we put this off for so long. I'm glad my husband was insistent today. I smile each time I go into the living room now.

Thursday, April 7, 2011

The Hair-bow Organizer

I've had many friends tell me that I'll need a way to contain the hair bow explosion after this baby arrives. Trusting their advice, I decided to make a hair bow organizer, much like the one pictured here, largely because it would be next to free. I have a friend who keeps chickens, so I picked up some extra chicken wire from her, cleaned it and spray painted it yellow (to make it almost cute). I also painted a frame (I dumpster dived months ago) the coral/pink color in my fabrics. Then I put it all together. Here's the finished look. I think I'm just going to lean it against the wall on top of the dresser, but I may decide to hang it later. We'll see. I currently have a total of 2 bows, so we'll see if I fill it up any time soon.


Chicken wire is NOT easy to work with. It likes to stay curled up. I had to unroll it and lay a board on top for a few days to get it to lay somewhat flat/less curled. After scrubbing it clean and spray painting it, I tried stapling it to the inside of the frame, but that wasn't working too well. After scraping my hand several times, I pulled all the staples out, wrapped the backing of the frame in the fabric (secured with duck tape) and then wrapped the chicken wire around the board. I had my husband cut the wires close (so I wouldn't cut my hands again...) once I got it folded down flat and used a mallet to hammer the finished product into the frame (it was a tight fit).

Saturday, April 2, 2011

Pink-ish Mirror and Finials

Last summer, I bought an Ikea bedroom set from my next door neighbor. I ended up selling most of the pieces and only kept the toy box and this mirror that I decided to paint coral for the nursery (and later girls room). I figure it'll be a nice spot for any tiny jewelry she might have. I forgot to take a picture of it before I started painting it and Ikea no longer sells this mirror. It's wood and matched the finish of the toy box.

Here's my after with my cute 2 year old modeling in the mirror.
And this is what I got when I told him to smile.

I also finished up the pink curtain rod finials mentioned yesterday. Here's the blurry before:
And the lovely after:
I spray painted the yellow part and then mixed some of my coral craft paint with water (about a 1:1 ratio) and lightly brushed it on. I wanted to keep the clear, translucent look of the original pink. It may not look that good up close, but from a distance it's really pretty and turned out just as I was hoping. And who's going to look that closely at my curtain finials when they're high up on the wall? Since it's paint on plastic, it's not durable, but again, no one will be touching them once they're on the wall (hopefully tonight). A true after won't be for a while since I doubt I'll be sewing the girls room curtains any time soon, but I'll show you when I get there.

Friday, April 1, 2011

Spray Painting Projects

This morning after dropping my oldest off at school, my younger 2 boys wanted to play outside. It wasn't long before I realized that there was no breeze. That never happens around here, so I decided to take advantage of it and do some spray painting in the back yard.

My nursery rocking chair went from ivory
to heirloom white.
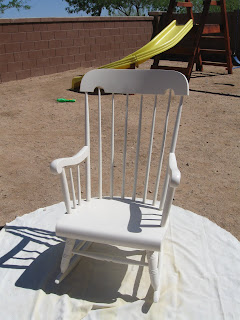
Again, the difference is much more noticeable in person. I'm still looking for a comfy, black cushion for it. I might try dying the cushion I already have black and see how that goes.

I also took a black frame and turned it white for the nursery.
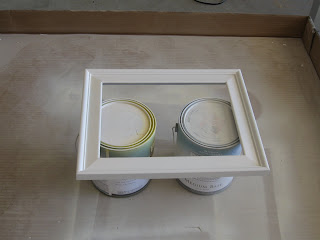
After picking up my son from school, I decided to head to Ross to look for a curtain rod for the girls room. A couple of weeks ago, my 2 younger boys pulled the old curtain and rod off the wall (breaking the rod) and that room is south facing, so it's BRIGHT during the day. It's also the only room my 4 year old can take a nap in (since the 2 year old is in their room sleeping). In other words, he hasn't had a nap in a few weeks and it's starting to show. He doesn't nap every day (he's 4), but 2 or 3 times a week, he could sure use one!

Did you know that you can get 10 ft decorative curtain rods at Ross for less than $20? I picked up this cute white rod with pink flower finials for $13.99 today. I wanted a white rod for the curtains I'll be making (one day...) and the flowers definitely go with the floral fabric I picked out. However, the baby pink isn't me, so it had to go. I spray painted the pink wooden part of the finial yellow this afternoon (pic to come later) and I'm hoping to transform the rest of it to a darker, more coral color to better match the fabric tonight.


I also scrubbed clean a piece of chicken wire I got from a friend and spray painted it yellow for my hair-bow organizer. I just need to paint the frame and put it all together. I'm hoping it turns out like I have it pictured in my head.

Well, enough updating, I'm off to work on some projects...

LinkWithin

Blog Widget by LinkWithin